Assigning a Material to Toolbox Parts
Tips and Tricks • Bill • 9 December 2015
Want to assign a material to your SOLIDWORKS Toolbox parts? Here’s how to do it.
- Launch the Toolbox configuration setup.
- Select Step 2 – Customize Hardware.
- Drill down to the component to which you wish to add the custom property, e.g. Hex Bolt Grade C AS 1111.1.
- Under Custom Properties, click “Add New Custom Property”, as shown below.

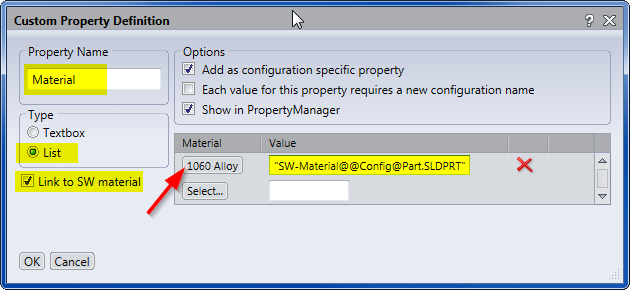
- Enter the property name, e.g. Material, as shown below.
- Under Type, select “List” and enable “Link to SW material”, as shown below.
- Click the Select button and select the material from the drop-down list, as shown below.
- For Value, enter the following syntax “SW-Material@@Config@Part.SLDPRT”. You MUST include the quotation marks.
- Click OK.
- Tick the box to enable the new custom property, as shown below.

- Save the Toolbox.
Note, this custom property will not be applied to Toolbox components that have already been inserted into assemblies. It will only be applied to Toolbox components inserted after the custom property has been added.